Configuring iCloud in iOS 5
The first time you install iOS 5, you’ll be asked to configure an iCloud account by providing or creating an Apple ID. Configuration steps will also allow you to set which services you want to synchronize (calendar, contacts, etc.). Those configurations are also available under Settings\iCloud on your device.
Before you proceed any further with this tutorial, make sure that you have iOS 5 installed on two test devices, and that iCloud is working properly on both devices.
Enabling iCloud in your App
There are three steps to use iCloud in an app, so let’s try them out as we start this new project.
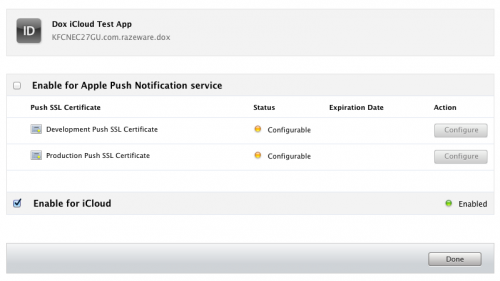
1. Create an iCloud-enabled App ID
Push Notifications and Game Center are automatically enabled, but iCloud requires you to manually enable it. Click the Configure button to continue.

On the next screen, click the checkbox next to Enable for iCloud and click OK when the popup appears. If all works well, you will see a green icon next to the word Enabled. Then just click Done to finish.
2) Create a provisioning profile for that App ID
Still in the iOS Provisioning Portal, switch to the Provisioning tab, and click New Profile. Select the App ID you just created from the dropdown.
After creating the profile, refresh the page until it is ready for download, and then download it to your machine. Once it’s downloaded, double click it to bring it into Xcode, and verify that it is visible in Xcode’s Organizer:
3) Configure your Xcode project for iCloud
Once you’ve finished creating the project, select your project in the Project Navigator and select the project target. Select the Summary tab, and scroll way down to the Entitlements section.
Once you’re there, click the Enable Entitlements checkbox, and it will auto-populate the other fields based on your App ID, as shown below:
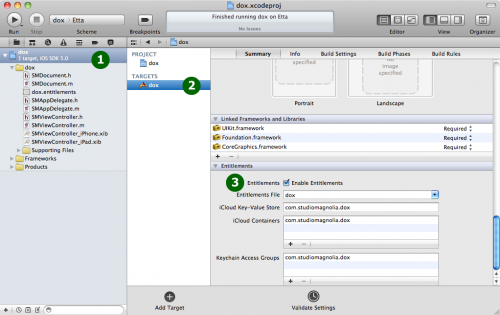
This is what the fields here mean:
→ The Entitlements File points to a property list file which, much like the info.plist file, includes specifications about application entitlements.
→ The iCloud Key-Value Store represents the unique identifier which points to the key-value store in iCloud.
→ The iCloud Containers section represents “directories” in the cloud in which your application can read/write documents. Yes, you have read correctly, I said applications (plural), for a user’s container can be managed by more than one application. The only requirement is that applications have to be created by the same team (as set up in the iTunes Developer Center).
→ The Keychain Access Groups includes keys needed by applications which are sharing keychain data.
Checking for iCloud Availability
When building an application which makes use of iCloud, the best thing to do is to check the availability of iCloud as soon as the application starts. Although iCloud is available on all iOS 5 devices, the user might not have configured it.
To avoid possible unattended behaviors or crashes, you should check if iCloud is available before using it. Let’s see how this works.
Open up AppDelegate.m, and add the following code at the bottom of application:didFinishLaunchingWithOptions (before the return YES):
NSURL *ubiq = [[NSFileManager defaultManager]
URLForUbiquityContainerIdentifier:nil];
if (ubiq) {
NSLog(@”iCloud access at %@”, ubiq);
// TODO: Load document…
} else {
NSLog(@”No iCloud access”);
}
NSURL *ubiq = [[NSFileManager defaultManager]
URLForUbiquityContainerIdentifier:nil];
if (ubiq) {
NSLog(@”iCloud access at %@”, ubiq);
// TODO: Load document…
} else {
NSLog(@”No iCloud access”);
}
iCloud API Overview
n iCloud UIDocument acts as middleware between the file itself and the actual data. In your apps, you’d usually create a subclass of UIDocument and override a few methods on it that we’ll discuss below.
UIDocument implements the NSFilePresenter protocol for you and does its work in the background, so the application is not blocked when opening or saving files, and the user can continue working with it. Such a behavior is enabled by a double queue architecture.
The first queue, the main thread of the application, is the one where your code is executed. Here you can open, close and edit files. The second queue is on the background and it is managed by UIKit.
When we want to open a file stored in iCloud. We’d send a message like the following:
[doc openWithCompletionHandler:^(BOOL success) {
// Code to run when the open has completed
}];
// Code to run when the open has completed
}];
This triggers a ‘read’ message into the background queue. You can’t call this method directly, for it gets called when you execute openWithCompletionHandler. Such an operation might take some time.Once the reading is done we are free to load the data returned by the read operation.
This is exactly where UIDocument comes in handy, because you can override the loadFromContents:ofType:error method to read the data into your UIDocument subclass.
- (BOOL)loadFromContents:(id)contents ofType:(NSString *)typeName
error:(NSError **)outError{
self.noteContent = [[NSString alloc]
initWithBytes:[contents bytes]
length:[contents length]
encoding:NSUTF8StringEncoding];
return YES;
}
This method is called by the background queue whenever the read operation has been completed.
After loadFromContents:ofType:error completes, you’ll receive the callback you provided in the openWithCompletionHandler: block,To sum up, when you open a file you receive two callbacks: first in your UIDocument subclass when data has been read, and secondly when open operation is completely finished.
The write operation is pretty similar and it exploits the same double queue. The difference is that when opening a file we have to parse an NSData instance, but while writing we have to convert our document’s data to NSData and provide it to the background queue.
To save a document, you can either manually initiate the process by writing code, or via the autosaving feature implemented in UIDocument.
To save a document, you can either manually initiate the process by writing code, or via the autosaving feature implemented in UIDocument.
If you want to save manually, you’d call a method like this:
[doc saveToURL:[doc fileURL]
forSaveOperation:UIDocumentSaveForCreating
completionHandler:^(BOOL success) {
// Code to run when the save has completed
}];
Here you should return an NSData instance which describes the current model to be saved.
write the background queue accomplished by overriding another method of UIDocument – contentsForType:error.
- (id)contentsForType:(NSString *)typeName error:(NSError **)outError {
return [NSData dataWithBytes:[self.noteContent UTF8String]
length:[self.noteContent length]];
}
return [NSData dataWithBytes:[self.noteContent UTF8String]
length:[self.noteContent length]];
}
The rest is taken care of in the background queue, which manages the storing of data. Once done the code in the completion handler will be executed.
Subclassing UIDocument
Create a new file with the class template. Name the class, and make it a subclass of UIDocument.
#import “AppDelegate.h”
@interface iCloudDoc : UIDocument{
}
@end
As we have learned above we have two override points, one when we read and one when we write. Add the implementation of these by replacing iCloudDoc.m with the following:
#import “iCloudDoc.h”
@implementation iCloudDoc
- (NSString *) GetDatabasePath:(NSString *)dbName{
NSArray *paths = NSSearchPathForDirectoriesInDomains(NSDocumentDirectory , NSUserDomainMask, YES);
NSString *documentsDir = [paths objectAtIndex:0];
return [documentsDir stringByAppendingPathComponent:dbName];
}
// Called whenever the application reads data from the file system
- (BOOL)loadFromContents:(id)contents ofType:(NSString *)typeName error:(NSError **)outError{
if ([contents length] > 0) {
NSData *data = [NSData dataWithBytes:[contents bytes] length:[contents length]];
NSString *filePath = [self GetDatabasePath:@"LeadRunnerDB.db"];
[data writeToFile:filePath atomically:YES];
}
return YES;
}
When we load a file we get the NSData contents returned by the background queue. Conversely, when we save we have to save file into an NSData object.
// Called whenever the application (auto)saves the content of a note
- (id)contentsForType:(NSString *)typeName error:(NSError **)outError {
NSString *filePath = [self GetDatabasePath:@"LeadRunnerDB.db"];
NSData *data = [NSData dataWithContentsOfFile:filePath];
return data;
}
@end
- (id)contentsForType:(NSString *)typeName error:(NSError **)outError {
NSString *filePath = [self GetDatabasePath:@"LeadRunnerDB.db"];
NSData *data = [NSData dataWithContentsOfFile:filePath];
return data;
}
@end
Believe it or not, the code we need to model the document is already over! Now we can move to the code related to loading and updating.
Opening an iCloud File
let’s extend the application delegate to keep track of our data, and a metadata query to look up the document in iCloud. Modify AppDelegate.h to look like the following:
@interface AppDelegate : UIResponder <UIApplicationDelegate>{
}
@property (nonatomic,retain) NSMetadataQuery *query;
@property (strong, nonatomic) UIWindow *window;
@property (strong, nonatomic) UINavigationController *navigationController;
- (void)loadNotes;
@end
@interface AppDelegate : UIResponder <UIApplicationDelegate>{
}
@property (nonatomic,retain) NSMetadataQuery *query;
@property (strong, nonatomic) UIWindow *window;
@property (strong, nonatomic) UINavigationController *navigationController;
- (void)loadNotes;
@end
Then switch to AppDelegate.m and synthesize the new properties:
@synthesize query = _query;
We’ve already added code into application:didFinishLaunchingWithOptions to check for the availability of iCloud. If iCloud is available, we want to call the new method we’re about to write to load our document from iCloud, so add the following line
[self loadDocument];
If you ever worked with Spotlight on the Mac, you’ll be familiar with the class NSMetadataQuery. It is a class to represent results of a query related to the properties of an object, such as a file.
If you ever worked with Spotlight on the Mac, you’ll be familiar with the class NSMetadataQuery. It is a class to represent results of a query related to the properties of an object, such as a file.
In building such a query you have the possibility to specify parameters and scope, i.e. what you are looking for and where. In the case of iCloud files the scope is always NSMetadataQueryUbiquitousDocumentsScope.
You can have multiple scopes, so we have to build an array containing just one item.
You can have multiple scopes, so we have to build an array containing just one item.
Now you can provide the parameters of the query. Basically, you build a predicate and set it as parameter of a query/search.
When you use %@ in predicates, it wraps the value you provide in quotes. You don’t want this for keypaths, so you use %K instead to avoid wrapping it in quotes.
When you use %@ in predicates, it wraps the value you provide in quotes. You don’t want this for keypaths, so you use %K instead to avoid wrapping it in quotes.
Now the query is ready to be run, but since it is an asynchronous process we need to set up an observer to catch a notification when it completes.
NSMetadataQueryDidFinishGatheringNotification. This is posted when the query has finished gathering info from iCloud.
NSMetadataQueryDidFinishGatheringNotification. This is posted when the query has finished gathering info from iCloud.
- (void)loadNotes {
NSURL *ubiq = [[NSFileManager defaultManager] URLForUbiquityContainerIdentifier:nil];
if (ubiq) {
self.query = [[NSMetadataQuery alloc] init];
[self.query setSearchScopes:[NSArray arrayWithObject:NSMetadataQueryUbiquitousDocumentsScope]];
NSPredicate *pred = [NSPredicate predicateWithFormat: @"%K like 'LeadRunnerDB.db*'", NSMetadataItemFSNameKey];
[self.query setPredicate:pred];
[[NSNotificationCenter defaultCenter] addObserver:self
selector:@selector(queryDidFinishGathering:)
name:NSMetadataQueryDidFinishGatheringNotification
object:self.query];
[self.query startQuery];
} else {
NSLog(@”No iCloud access”);
}
}
Now that this is in place, add the code for the method that will be called when the query completes:
- (void)queryDidFinishGathering:(NSNotification *)notification {
NSMetadataQuery *query = [notification object];
[query disableUpdates];
[query stopQuery];
[self loadData:query];
[[NSNotificationCenter defaultCenter] removeObserver:self
name:NSMetadataQueryDidFinishGatheringNotification
object:query];
self.query = nil;
}
NSMetadataQuery *query = [notification object];
[query disableUpdates];
[query stopQuery];
[self loadData:query];
[[NSNotificationCenter defaultCenter] removeObserver:self
name:NSMetadataQueryDidFinishGatheringNotification
object:query];
self.query = nil;
}
if you don’t stop it it runs forever or until you quit the application. Especially in a cloud environment things can change often. It might happen that while you are processing the results of a query, due to live updates, the results change! So it is important to stop this process by calling disableUpdates and stopQuery. In particular the first prevents live updates and the second allows you to stop a process without deleting already collected results.
We then remove ourselves as an observer to ignore further notifications, and finally call a method to load the document, passing the NSMetadataQuery as a parameter.
Add the starter implementation of this method next (add this above queryDidFinishGathering):
- (void)loadData:(NSMetadataQuery *)query {
for (NSMetadataItem *item in [query results]) {
NSURL *url = [item valueForAttribute:NSMetadataItemURLKey];
iCloudDoc *doc = [[iCloudDoc alloc] initWithFileURL:url];
[doc openWithCompletionHandler:^(BOOL success) {
if (success) {
NSLog(@"database to open from iCloud");
} else {
NSLog(@"failed to open from iCloud");
}
}];
}
}
When you create a UIDocument (or a subclass of UIDocument like iCloudDoc), you always have to use the initWithFileURL initializer and give it the URL of the document to open. We call that here, passing in the URL of the located file, and store it away in an instance variable.
Now we are ready to open the Document. As explained previously you can open a document with the openWithCompletionHandler method, so continue loadData as follows:
You can run the app now, and it seems to work… except it never prints out either of the above messages! This is because there is currently no document in our container in iCloud, so the search isn’t finding anything (and the result count is 0).
When the query returns zero results, we should:
→ Retrieve the local iCloud directory
→ Initialize an instance of document in that directory
→ Call the saveToURL method
→ When the save is successful we can call openWithCompletionHandler.
→ Initialize an instance of document in that directory
→ Call the saveToURL method
→ When the save is successful we can call openWithCompletionHandler.
Compile and run your app, and you should see the “database to open from iCloud” message arrive the first time you run it, and “iCloud document opened” in subsequent runs.
You can even try this on a second device, and you should see the “database to open from iCloud ” message show up on the second device (because the document already exists on iCloud now!)
No comments:
Post a Comment